I have released four recipe books so far:

The Best of the Sunny Raw Kitchen
The Best of Raw Freedom Community
Delightfully Raw and
Deliciously Raw

These feature some of the most delectable creations to have come out of my raw kitchen and will appeal to anyone interested in a healthier diet, regardless of their level of knowledge and experience. From easy one-step everyday fare to more elaborate and involved gourmet dishes and layered cakes, they offer something for everyone and every occasion. Incredibly tasty smoothies, creamy and comforting warm soups, sexy salads, delicious nut cheezes, satisfying entrees and scrumptious guilt-free desserts...

Healthy food never tasted so good!

To learn more about my recipe books, click here!

Sunday, March 25, 2007

Color Your World Green

It's official! Spring is here! Yippee!

Wow! It's hard to believe winter is already over. This one just zoomed right by me, I tell ya!

On my walk today, I was surrounded by the undeniable signs of the season turning; birds chirping away gleefully, the sun shining higher in the sky, and feeling ever so much warmer on my skin; snow melting and causing the near-by creek to roar in the distance. Everywhere, Nature slowly awakening from its long dormancy. I've even seen a few tentative buds peeking out, but leaves will have to wait a little while longer, as we're always somewhat behind, up here on the mountain.

Hard to think of spring without having images of bright, tender green dancing in our mind's eye. In celebration of all the vibrant, beautiful 'greeness' to come (or that's already there for some of you), I thought I'd devote this post to what has become one of our favorite foods: GREENS!

Lately, I've been noticing how nearly everything we eat is green. Spring fever you say? Yeah, you might be right. For instance, earlier this week, we had green smoothie, Spinach-Arugula Cream Soup, green salad with my rendition of Green Goddess Dressing, and carrot (oops!) and zucchini pasta with Cilantro-Dill Pesto... All on the same day! See what I mean?

The Popeye Legacy
I grew up with the motto "Eat your greens!" resonating in my ears, and watching Popeye get supernatural powers from gulping down tins of spinach. (Although, as we know, raw would have been wayyyy more potent!) Still, you gotta give it to the guy; he was definitely onto something!

Actually, during my monthly chat with my mom a few nights ago, she told me she had just served some steamed spinach glistening with butter to my dad for supper and (lo and behold!), he complained it tasted 'too green'. (he he) "It's good for you!" she replied,"And it's full of vitamins too!" It was so apropos, I just had to laugh...

Even though she told me the exact same thing countless times in my youth, I was never really sure exactly why greens were so 'good for me'. It's hard to operate on blind faith alone (nor should we anyway, right?) Who doesn't have 'fond' memories of forcing greens down their throats? I needed to find out for myself what the heck's really behind all this rap about greens. So I put a lot of energy into exploring this, researching different sources on the net.

A Couple of Rules of Thumb (Green and Otherwise)
But before I share my findings with you, there's a few things I feel need saying. As my regular readers know, I usually try to stay clear of the more intellectual aspects surrounding the Raw Food Diet. It was difficult, however, to talk about greens without getting into the 'why' they are so 'good for you', at least to some degree. In doing this, I feel there's a risk that you may start beating yourself up over how little greens you eat or scrambling around, trying to come up with an action plan about how to get more into your system.

It can get pretty confusing as to 'what is best for us' (whether in life in general or when it comes to diet), as we're constantly being bombarded with contradictory information from right, left and center. It's so easy to move away from our personal experience and get caught into someone else's reality. Here's a couple of rules of thumb that we have learned and found to be helpful along the way in dealing with this difficult issue.

1- Don't Believe Anything Anybody Else Says (Including Me!)
No matter how respected or knowledgeable someone is (or seem to be) about something, you have to take it with a grain of salt, and experience for yourself what works for you (or doesn't!) Until that happens, it is going to be nothing but an intellectual concept.

2- It's All An Experiment Anyway!
Don and I try to approach everything in our lives, including our diet, not as something static and fixated, but rather as an experiment. A fun, everlastingly new and fascinating adventure; its outcomes remaining unknown. This helps us to be gentle on ourselves and avoid the deadly traps of guilt and self-condemnation. Whatever happens, it's all about learning more about ourselves and how to be in the world.

A'right! Now that's out of the way, what follows is a summary of my discoveries.

Green Power
Here are a few neat facts about green veggies that I learned from Frederic Patenaude, co-founder with Victoria Boutenko of the 'Green for Life Program':

Greens contain...

- more vitamin A than carrots
- more vitamin C than oranges
- more vitamin E than whole wheat
- more vitamin B2 than milk
- quality proteins (with a good amino acid profile)

According to Fred, greens "provide essential alkaline minerals, such as calcium and magnesium, that are found in insufficient quantities in fruit, nuts and seeds, not to mention in other more conventional, acid-forming foods." They are also rich in potassium, iron and zinc. All of which are essential for human health.

Ahhhhh! OK, now I'm starting to get the picture!

Green Rawvolution
Even though the 'Eat Your Greens' campaign has been going on
for at least a few decades, Victoria Boutenko has given the old adage a fresh twist. In the last couple of years, with the release of her book 'Green for Life', she has actually started a little 'Green Revolution'.

Sure, 'green drinks' have been the 'in thing' for a while in the health-oriented community, but Victoria's 'green smoothies' have taken things to a whole new level. Personally, I've always had a hard time going for the powdered stuff, be it supplements or so-called 'super foods'. As Fred puts it: "there's no 'food' that arrives in a bottle, having been made in a factory and sold in powdered form, that will ever compare in terms of 'super-nutrition' to fresh fruits and vegetables."

Because minerals and other nutrients interact with each other in a way that can affect their absorption in the body, eating a plant whole is essential for complete assimilation."Even the best 'powder' made of vegetables or algae looks bleak," Fred continues, "in comparison with the nutritional value obtained from fresh vegetables." This is what makes green smoothies so incredibly powerful.

The Holy Green Quest
After many years on a Raw Diet, during which they cured themselves of a variety of 'incurable' diseases, Victoria and her family felt that their health reached a plateau. They even started noticing signs of unhealth - a fact that she found very disturbing. Knowing that something wasn't quite right, Victoria embarked on a search for what was missing in their diet; a long journey which eventually led her to greens. "The more I read about the nutritional content of greens," she recalls, "the more I became convinced that greens are the most important food for humans."

To pinpoint the 'missing link', however, was only part of the answer for Victoria. She still wanted to know how much greens we need to eat for optimum health. In order to do that, she studied the eating habits of chimpanzees, since they are considered to be the closest creatures to human beings. "According to recent scientific research, they share 99.4 % of the same genes with humans." What she discovered is that greens compose almost half of their diet.

Based on her findings, Victoria now recommends to "work up to the equivalent of one average-sized bunch of greens per day", per person. (Whoa! That's A LOT of greens! We're talking 28 bunches a week for her family of four! How many fridges do they have?)

Get The Goodies
As Frederic points out in his 'Power of Greens Mini-Course', "we need to eat greens in such a way that the nutrients can be easily assimilated by the body. Salads are great, but often the tough fiber of greens is not chewed or broken down well enough...This is in addition to the fact that most people's digestion is not as optimal as it could be."

The solution? (and here's how Victoria Boutenko's discovery has revolutionized the way we think about greens): just let your blender do the work!

Drink Your Greens
Who would have thought that blending fruits and leafy green vegetables could make such a delicious and energizing brew! A veritable nutritional powerhouse! It's one of those things you gotta experience in order to believe it.

When she concocted her very first green smoothie, Victoria was initially a little skeptical. But then she discovered that by mixing the leafy greens with the right amount of fruits, the result was unlike anything she had ever tasted before: delicious, tasty and full of 'freshness'.

After consuming green smoothies daily for a month, Victoria started to
see "noticeable benefits in her health." She says that even the people who came to her office and drank an occasional cup of green smoothie would notice health improvements in themselves, such as craving more raw foods, weight loss and a receding eczema condition. 

Green Magic
Here are a few of the incredible benefits of green smoothies that I learned in Raw Family's "Ode to Green Smoothies", posted in their January 2005 Newsletter.

- Green smoothies are easy to digest. When blended well, all the valuable nutrients in these fruits and veggies become homogenized, or divided into such small particles that it becomes easy for the body to assimilate these nutrients, the green smoothies literally start to get absorbed in your mouth.

- Green smoothies, as opposed to juices, are a complete food because they still have fiber.

- Green smoothies belong to the most palatable dishes for all humans of all ages. With a ratio of fruits to veggies as 60:40, the fruit taste dominates the flavor, yet at the same time the green vegetables balance out the sweetness of the fruit, adding nice zest to it. Green smoothies are simply the best tasting dishes for the majority of adults and children.

- By consuming two or three cups of green smoothies daily, you will consume enough of greens for the day to nourish your body, and they will be well assimilated. Many people do not consume enough of greens, even those who stay on a raw food diet. The molecule of chlorophyll has only one atom that makes it different from a molecule of human blood. According to teachings of Dr. Ann Wigmore, to consume chlorophyll is like receiving a healthy blood transfusion.

- Green smoothies are easy to make, and quick to clean up after.

- Green smoothies are perfect food for children of all ages, including babies of six or more months old when introducing new food to them after mother's milk.

- When you consume your greens in the form of green smoothies, you can greatly reduce the consumption of oils and salt in your diet.

- Regular consumption of green smoothies forms a good habit of eating greens. Several people told me that after a couple of weeks of drinking green smoothies, they started to crave and enjoy eating more greens.


Shades of Green
As we've just seen, green vegetables are one of the most nutritious foods on the planet. But not only do we need to include a sufficient quantity in our diet, we've also got to have a good variety too.

Victoria stresses the importance of rotating in order to get as many different greens as we can. Some of the greens that contain the highest mineral content are the darker kinds and include: bok choy, broccoli raab, cabbage, celery, collards, kale, mustard greens, spinach, swiss chard, turnip greens and watercress.

Not all of those are good in smoothies or soups, however. Some might be at their best in juices or in salads. It's for you to experiment and discover what form is most enjoyable to you.


Going Green
Now that I've got you all hyped and excited about eating your greens (I hope!), here's a few easy ways to help you 'go green'.

Smooth Talk
Green smoothies may seem a little strange at first, but (as some of you may know), you quickly develop a taste for them. Now, at our place, we can't do without them! When we discovered green smoothies last summer, our first few creations were a little off putting. Still, we persisted until we found which went best, and the ratio of fruits to greens that we felt most comfortable with. If you haven't already, here are a few ideas to start you off...


Banana Blueberry Brew
by Frederic Patenaude

1 cup water
3 bananas
1 cup frozen blueberries (or fresh in season)
1 handful parsley
2 leaves kale

Blend water with fruits, and add greens progressively until smooth.
Use more or less water, as desired.


Green Papaya Smoothie
By Tera Warner

1/2 cup water
2 -3 cups papaya
1/2 cup frozen strawberries
2 bananas
3 big leaves swiss chard, no stem

Blend water papayas, and add other ingredients progressively. Blend until smooth. Delicious!


Our Daily Green Fuel
Don prepares our green smoothie around noon and we sip on it throughout the day. The last few months, our usual combination has been something like this:

1/2 avocado
2 to 3 bananas (fresh or frozen)
2 cups of fruits of choice (fresh or frozen)
2 to 3 cups greens (our favorites include spinach, swiss chard, collard greens and kale)
Juice of 5 or 6 oranges (or 2 to 3 whole oranges, peeled and seeded)
1 lemon, juiced
1 lime, juiced
1 to 1 1/2 cups of water

Blend until smooth. Add more or less water, to taste.

Yields 7 to 8 cups

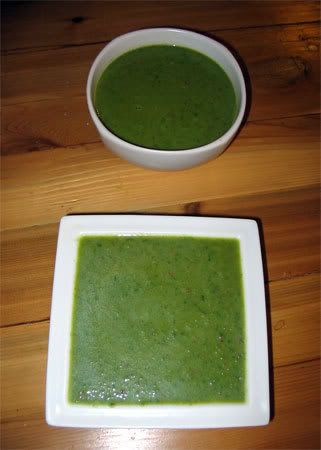
(The smoothie on the left was made with swiss chard and beet tops. The latter tends to make the color not-so-green anymore, but it still has all the goodies!)


Sunny Raw Tips
We buy lots of fruits while they're in season and freeze them. That way, we get to enjoy a variety of fruits in the wintertime, when the choices are pretty bleak.

As we don't own a high speed blender, Don has found out that it's best to blend the greens and the fruits without much liquid for a few seconds first. This allows for the fibers of the greens (especially the 'tougher' kinds) to be broken up better and therefore more easily assimilated.


For more great ideas, Victoria's "Ode to Green smoothies" lists a bunch of delicious combinations. (See Raw Family's January 2005 Newsletter). There's also several threads on Raw Food Talk so you might want to check them out. Here are a couple of them:

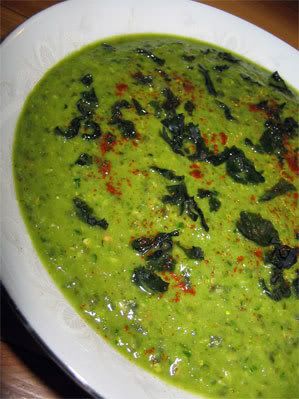
We Love Our Green Mush!
Another fabulous way to get your greens are soups. Green soups are part of our daily staples. We just have too many favorites to post them all, but here's a few to tempt your taste buds.

Carmella’s Spinach Cream
1 cup tomato
1 cup cucumber
3 celery stalks
3 cups spinach
1/2 avocado
1/2 apple
1 green onion
1 clove garlic
juice of 1/2 lime
juice of 1/2 orange
2 teaspoons basil
salt to taste
1 cup of water (or more)

Blend until smooth.

Serves 2


Popeye Soup
We've been making this soup for years and are still enjoying it regularly. It was first published in Dr Robert Young's book 'The PH Miracle' and can be found, along with many other tasty raw soup recipes, in a booklet you can download here.

1 avocado
1 cup water or veggie stock
2 cucumbers
1 cup raw spinach
1/3 red bell pepper
2 green onions
1 clove garlic
1/2 - 1 tsp: garam masala and curry
Tamari or Real Salt to taste
Lime or lemon juice, to taste

In blender, add avo and half the water and puree, then add the rest of the ingredients.

Thin with remaining water.

Serves 4


Frederic Patenaude has a number of yummy green soups as well in his book 'Instant Raw Sensations'. Like me, he has a thing for arugula, aka roquette. It has a bit of a bite and is just wonderful to spike up salads. It's also delicious in soups:

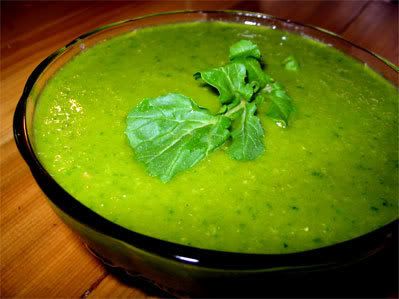
Spinach Arugula Cream
From Fred Patenaude's 'Instant Raw Sensations'

1 cup tomatoes
1 cup cucumber
1 lime, juiced (or 2 tbs apple
cider vinegar)
1 cup arugula
2 cups spinach
3 stalks celery
1 small avocado
2 tbs dulse powder (opt)

Blend tomatoes, cucumber and lime juice together. Add in the greens and avo progressively and blend until smooth. Before serving, sprinkle with dulse powder if desired.


Blended Salads
Blended salads are a different 'species' altogether. OK, they might look like green mush but, as Frederic puts it, they have "the power to completely transform your health." In his 'Greens Mini-Course', he explains that blended salads...

1- ... can contain more vegetables than green smoothies.
2- ... can included other types of vegetables you couldn't include in a green smoothie.
3- ...are easy to eat. If you want to eat your vegetables but hate to chew a salad for 1 hour, a blended salad is the answer.
4- ...contain nutrients that are digested and assimilated much more quickly than in a regular salad.

Last summer, when we first tried a blended salad, we weren't too sold on the idea, as it doesn't look very appetizing. We also used to add water which tended to dilute the taste. Blended salads are meant to be thick! But we gave it another shot recently and (Surprise! Surprise!) found it delectable! It may not look like much but boy, is it ever good (any way you look at it!)

Here's Fred's basic 'formula' for making a blended salad:

• In your blender or Vita-Mix, put in 1-2 tomatoes and/or peeled baby cucumbers cut in chunks, and blend.

• Add some lemon juice or apple cider vinegar.

• If desired, add half a red bell pepper, and continue blending.

• Add several leaves of lettuce, spinach, and other non-bitter greens. You can also add some green onions.

• Use celery stalks to push the ingredients in the blender (this will blend the stalks too).

• Add half to one avocado, and turn the whole thing into a liquefied, thick green blob.

• Season with powdered dulse (a seaweed). I like to use home-made dehydrated celery powder (as explained in “The Raw Secrets”).

• If desired, add in other seasonings of your choice and enjoy! (Most likely, on your own...)


The following recipe is one of the many possible variations and was utterly delicious!

Blended Salad
From Fred Patenaude's 'Recipe of the Week'

2 tomatoes, roughly chopped (about 2 cups)
1 cucumber, peeled and diced (about 1 cup)
1/2 lemon, juice of
2 cups lettuce
1 cup spinach
2 green onion
1/4 cup parsley
3 stalks of celery
1 small avocado
1 teaspoon agave nectar (optional)
2 tablespoons dulse flakes
1 sheet of nori, shredded
1 tablespoon paprika (optional)

Blend the tomatoes first, until they turn liquid. Then add in the lemon juice, greens, and avocado, pushing with the celery stalks, until the entire mixture is blended.

Flavor with dulse flakes, nori flakes, and/or paprika.

Blend well and enjoy!


Green Cuisine
Green smoothies and soups are fantastic ways to get more green veggies into your daily diet in a snap. However, Green Cuisine can take many other shapes and forms. Green juices are a great alternative, although, unlike smoothies, they don't retain all of the precious fibers. And of course there's good ol' salads too. (Check out my post on 'Splendid Salads' for a bunch of awesome recipes and tips.)

There are countless other delicious ways to be creative with greens. Here's a few of our latest favorites...

Green Goddess Dressing
1 or 2 tbs olive oil
2 tbs tahini
2 tbs lemon or lime, juice
nama shoyu, tamari or sea salt
2 garlic cloves
1/2 small avocado
1 cup parsley (packed)
1/4 fresh dill (packed)
1 green onion
1/2 cup water (or more)

Blend all ingredients until smooth. Add more water until the desired consistency is reached.

This dressing will thicken as it sits, so you may need to add more water later.
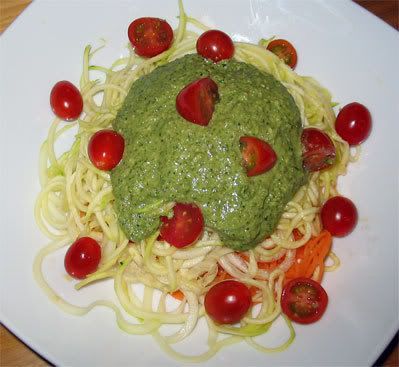

Cilantro-Dill Pesto
2 cups cilantro (packed)
1 cup fresh dill (packed)
2 tbs dried basil (or a few leaves fresh)
1/2 cup pumpkin seeds, ground
1/4 cup walnuts, ground
2 tbs oil
1 cup water
1 tbs nutritional yeast (opt)
lemon or lime juice, to taste
salt, to taste

Blend herbs and water until smooth. Then add the rest of the ingredients.

Serve on top of your favorite veggie pasta.


Now, for something quite different, how about green burgers? These are incredibly tasty and perfect to satisfy my ever-growing green cravings...

Kale Patties
Posted in RawGuru's latest newsletter

2-3 cups dino or curly kale (chopped) (I didn't have kale so I used collard and spinach instead)
1/2 cup fresh herbs (parsley, dill, or cilantro)
1/2 clove fresh garlic
2 tbs. almond butter
3 tbs. almond powder (I used left-over pulp, from making almond milk)
1 fresh tomato
1/2 teaspoon Himalayan Crystal Salt

Place the almond butter and tomato in a food processor. Process until mixed. Add in the rest of the ingredients. Add more almond powder if it needs to be firmer. (I ended up using about 5 tbs total)

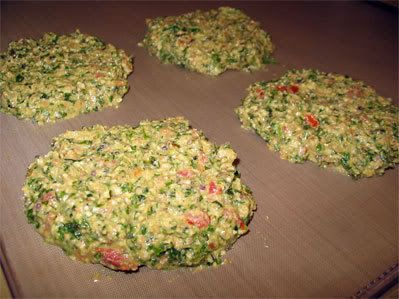
Taste the patty mixture and form into medium sized balls. Place these balls on a dehydrator sheet and press down on them to form a flat round with a fork. Dehydrate for 6-10 hrs at 110 degrees F. Place in fridge once finished.

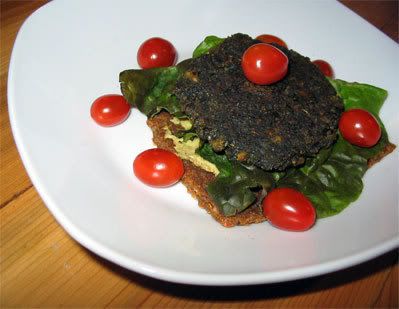
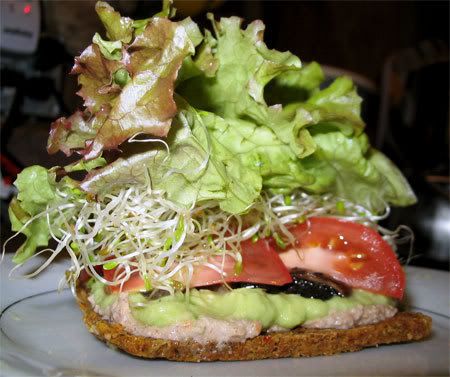
Serve on top of Tomato-Herb Bread with avocado mayo. Recipes posted here.
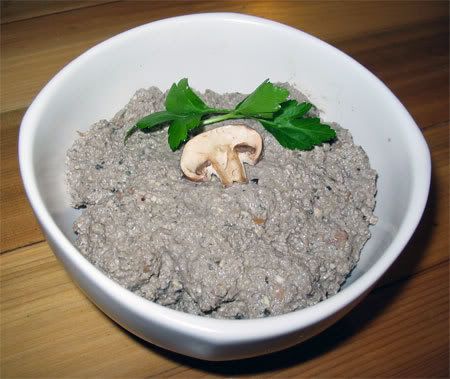
Carmella's Notes:
I strongly recommend doubling the recipe, as it didn't yield much at all (about 1 cup or 4 patties). For a fantastic spread, just skip the dehydration altogether and enjoy on crackers or breads. Alternatively, you can also use it as filling for quiche (see recipe below.) Yummo!

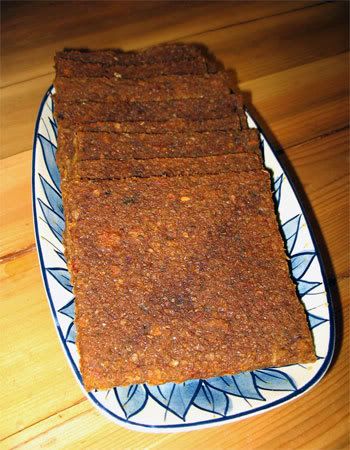
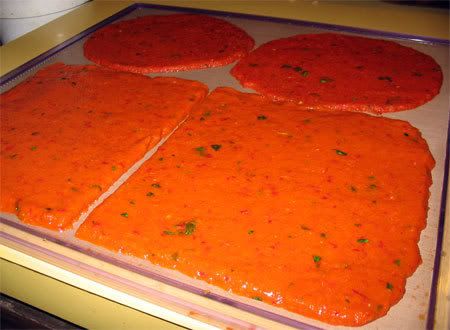
Kale Patties before going into the D:


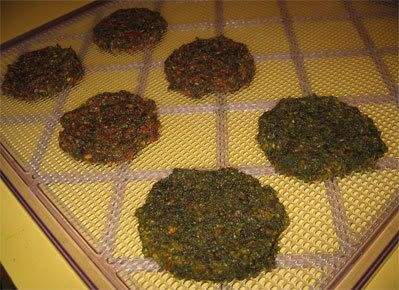
Kale Patties (left) and 'Green Power Burgers' (right) made with a mixture of kale, collards and spinach after dehydration:


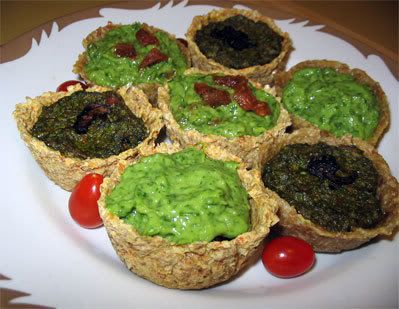
And now for the grand finale: my Spinach Mini-Quiches!

All this talk about greens got my creative juices going. As I had yet to find a spinach quiche recipe that we really like, I decided it was time for me to come up with one of my own. Most quiche recipes call for psyllium as a thickening agent in the filling, which gives it a slimey texture that Don and I don't particularly care for. Size was another issue, as a big quiche makes too much for the two of us. So I settled for mini-quiches instead.

These are, hands-down, my most delectable raw creations as of yet. We were both astounded at the result! The Mini-Quiches would also make fantastic finger foods for parties or potlucks.

Spinach Mini-Quiches

Crusts
I experimented with two different kinds of crusts as a base for the quiches. One is the ever-versatile calzone crust from Alissa Cohen's 'Living on Live Food'. The other is also found in Alissa's book, and is the crust from Elaina Love's Spinach Mushroom Quiche.

Crust #1 :
From the Spinach Mushroom Quiche recipe by Elaina Love

3 medium sized yellow zucchini, chopped (about 3 cups)
2 teaspoons sea salt
1/2 cup olive or coconut oil
1 cup flax meal (about 3/4 cup whole seeds, ground)
1 cup soaked almonds (about 1/2 cup before soaking for 8 hours)

1. Blend the zucchini, sea salt and oil until zucchini is smooth.

2. Add the almonds and continue to blend until the entire mixture is smooth. You may need to use a spatula or celery stick to get the mixture to blend.

3. Pour the blended mixture into a bowl and add the flax meal.

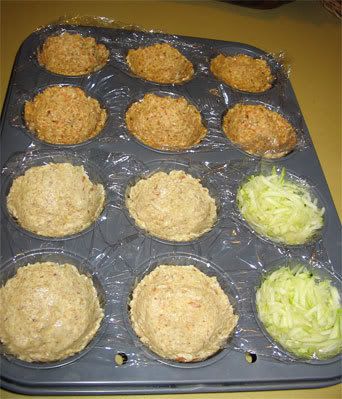
4. Here is where I deviated from the original recipe. Using a muffin pan lined with saran wrap, I formed the batter into mini crusts. I put about a couple of tbs of dough in one of the muffin cups. Then, spread it thinly with a wet spoon (makes it easier to work with) and my fingers, all along the bottom and 'walls'. After a few hours, once the outside shell was dry, I simply pulled on the saran wrap and gently turned the shells over onto the mesh to finish dehydrating.

If you'd rather go for larger sized quiche, just follow Elaina's original directions:

Shape into 4 pizza shaped crusts on dehydrator screens covered with Teflex sheets. Dehydrate the crusts at 105 degrees for 4 hours.

5. Remove the Teflex sheets and continue to dehydrate until the crusts are hard. It may take 8 or more hours altogether.


Crust #2: Calzone Dough
From Alissa's 'Living on Live Food'

4 cups Sprouted Buckwheat
1 1/2 cups Soaked Flax Seeds
3/4 cups Olive Oil (1/4 cup works good!)
1 1/2 cups Carrots
2 Cloves Garlic
1 teaspoons Curry
1 teaspoons Rosemary
1 teaspoons Thyme
2 teaspoons Sea Salt

Grind the carrots in food processor. Add in rest of ingredients and blend well until reach dough-like consistency. Mold the dough in muffin pans lined with saran wrap, as described above. Dehydrate for a few hours, and then gently turn onto the mesh to allow for the bottom of the shells to dry.

Carmella's Notes: I halved the recipe as it makes quite a lot of dough. Alternatively, you could make the whole thing and shape whatever excess dough into pizza crusts or make them all into mini shells and freeze them.

The crusts on the way to the D. You can see the Calzone Crusts in back and Elaina Love's in front. I also did a couple with only grated zucchini but they didn't turn out so well:


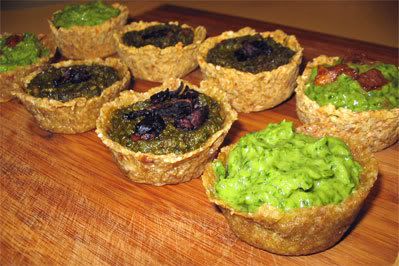
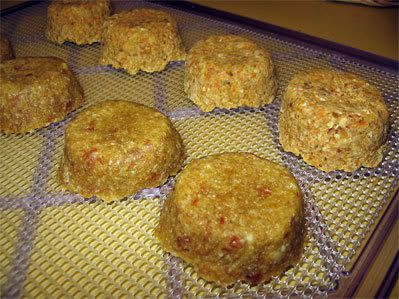
Here they are, freshly out of the D:


Quiche Fillings
I also tried a couple of different quiche fillings. One is based on RawGuru's Kale Patties recipe listed above. The other is a recipe I've come up with.

Filling #1: Spinach Almond Filling
Adapted from RawGuru's Kale Patties

2-3 cups spinach (I also used a little collard but you don't have to)
1/2 cup fresh herbs (parsley, dill, or cilantro)
1 clove fresh garlic
2 tbs. almond butter
5 tbs. almond pulp, from making almond milk
1 fresh tomato
1/2 teaspoon Himalayan Crystal Salt

A few mushrooms marinated in a little oil and tamari, Nama Shoyu, Braggs or salt, chopped up

Place the almond butter and tomato in a food processor. Process until mixed. Add in the rest of the ingredients (except for the mushrooms). Taste the filling mixture and adjust seasonings.

Put some marinated mushrooms at the bottom of the shell crusts. Pour filling mixture on top. Decorate with a few mushrooms and dehydrate for a couple of hours at 110.

Filling #2: Spinach Velvet Cream Filling
2 avocados
4 cups spinach
1/2 cup fresh cilantro
1/2 cup fresh dill (or 1 tsp dried)
1 tbs olive oil
3/4 cup zucchini, roughly chopped
lemon juice, to taste
1 or 2 garlic cloves
1/2 tsp onion powder
1/2 tsp sea salt or more if needed
Pinch of nutmeg (optional)

2 tbs soaked sun dried tomatoes, chopped (optional)
A few mushrooms marinated in a little oil and tamari, Nama Shoyu, Braggs or salt, chopped up

Blend all of the ingredients, except for the sun dried tomatoes and mushrooms, until smooth and consistent. Add water if too thick. If desired, fold sun dried tomatoes into spinach mixture.

Put some marinated mushrooms at the bottom of the shell crusts and pour filling on top. Decorate with a few mushrooms or chopped sun dried tomatoes. Refrigerate for up to 4 hrs or serve immediately.

Devour with abandon!


Riding The Green Wave
In my inbox today, I just saw that Karen Knowler and I were on the same wavelength, celebrating the arrival of Spring by focusing on the magic of greens. Her latest article on 'How To Go More Green In YOUR Diet' gives you "10 Easy Ways to Make Green Foods Part of Your Everyday Diet – and Love Them!" (It may not be posted on her site yet, but it should be soon.)

I find Karen's free weekly e-zine, 'Successfully Raw', refreshing and fun. It is also filled with awesome insights into the Raw Diet, thought-provoking articles, as well as recipes and tips. If you haven't already, you can sign up to receive 'Successfully Raw' and get 10 free recipes here.

Karen has also recently decided to personally 'go more green' and to keep an online journal about it. Check out her blog, 'Karen Goes Green', where she'll be sharing her "green-related musings, menus, and rediscoveries..."


So hey, now are YOU ready to color your world green too?

P.S. Makes you wonder whether the Big Bad Wolf would have gotten a beating from Little Green Riding Hood, eh?

*~*~*~*
Photo Credits
Awakening by Andee
Taste's SO good! by ucumari
Ornament by True Bavarian
Spinach by creativity+
Always eat your greens by ucumari
Green Smoothie Watermelon by Sproutgrrl
Very Green Green Smoothie by mercystreet
Jen and marks garden by digitalambitions
Blueberries by heysana


Saturday, March 17, 2007

Ode To Raw Sammies (And Wraps Too!)

As much as we enjoy a complex, raw gourmet meal, we often eat quite simply. For me, nothing beats a simple supper of soup, salad, and an open faced sandwich on raw crackers or bread. Oh, and sprouts, lots and lots of sprouts! Yum! Simplicity at its best! Plus, sandwiches are always a perfect answer for those days when I don't have a great deal of time or energy to put into preparing our evening fare.

Revamping An Ol' Favorite
Once upon a time, before the advent of microwave ovens and TV dinners, sandwiches (in their many forms and shapes), were the obvious choice when it came to eating something that needed to be simple, quick, and even portable. Between school, work, road trips and parties, I'm sure we've all eaten our fair share of them. I never knew how much I missed having sandwiches, though, until I discovered raw breads. "Can't reinvent the wheel," you say? Well, maybe you can after all...

WonderBread: The Raw Generation
Like most people, bread used to play a prominent part in my diet. Toasted bread for breakfast, bread for lunch or dinner, and sometimes bread for late-night snacks. I even worked at an artisan organic bakery at some point, eating soooooo much of it; I was turning into a Pillsbury Dough Girl.

When I seriously started cleaning up my diet, bread was one of the first things to go. (I gotta say that my sensitivities to gluten really helped breaking my bread addiction!)

We never dreamed of having raw breads until we got our Excalibur dehydrator. I mean, sure, we had tried the 'Manna Bread' sold in health food stores, but never quite took to it. (Tasted too much like cake to me!) However, I was thrilled when I unbaked my first batch of raw bread. Yay! At last, something simple to enjoy with our daily soups!

I discovered the Onion Bread and Russell James' Almond Bread recipes early on (both of which I have already posted, just check the Recipe Index). These have become our staples and make such fantastic bases for sandwiches, that it sort of stopped my bread quest in its tracks. As a result, I haven't been experimenting much with sprouted grain-based breads. However, Alissa Cohen's calzone dough (another house favorite), is made with sprouted buckwheat and is so wonderfully adaptable that you can use it as a base for whatever bread you want. Just play around with the seasonings...


Aside from the many bread recipes in her book 'Living on Live Food', Alissa has a Rye Bagels recipe. Although I haven't had a chance to try it yet, it's said to be very good. She has actually shared the recipe on the Forum. Just look here.

Still, I haven't totally given up on new bread recipes. In fact, I just made RawGuru's Tomato Herb Bread. Although the recipe needs a little tweaking (see my comments), it is absolutely delish! A new favorite!

Tomato Herb Bread
Posted by RawGuru in his latest newsletter

1 cup almond flour
1 cup sunflower seeds
3 tbs. flax seed meal (I doubled the amount)
½ apple (chopped)
1 fresh tomato
2 tbs. avocado oil (olive oil works fine!)
1 teaspoon Himalayan Crystal Salt
2 teaspoons Wild Tomato Concentrate (I just used more sun dried tomatoes)
½ cup soaked sun dried unsalted tomatoes
1 clove garlic
½ cup parsley
1 teaspoon dry Italian herb seasoning
1 tbs. lemon juice

In a food processor or high speed blender, grind the almonds and sunflower seeds until fine. Set aside in a large mixing bowl.

In a blender, add the rest of the ingredients and blend till thick. Add this mixture into the nut/seed flour. Stir everything with a wooden spoon or by hand. The dough should be pliable and elastic. Add more flax seed meal if you think it's necessary.

Line a few dehydrator trays with teflex sheets and spread a thin layer of the dough with a spatula. Make it about 1 inch in height. (!?!) Using a butter knife cut through the dough to form 9-10 squares. Dehydrate for 3 hrs. and remove from the teflex sheet and place on the mesh sheets. Dehydrate for 8 hrs or until firm.

Carmella's Notes:
This bread tastes totally awesome, however, it needs a little tweaking. Nothing that can't be easily overcome though! I don't know if I did something wrong here (all I can think of is that I used left-over almond pulp instead of almond flour), but it did not yield a lot of dough at all. There is no way you could spread the dough an inch thick and fill several trays like the recipe suggests! I also ended up adding some of the soak water in order to make the dough more manageable and still, it just barely filled a single tray, spreading the batter more like a 1/4 inch thick. In any case, I'd strongly recommend doubling the recipe to make it worth your while. It's so delish, you won't regret it!

As always, you can check out the Raw Food Talk archives, but here's a couple of threads you might find of interest in regards to breads:


Fillings Galore
If I was to list all the possibilities of sandwich fillings to choose from, this could easily turn into the longest blog post in history! Nut 'cheeses', spreads, pates... Just take your pick!


There are raw renditions to virtually every SAD fillings you can think of, including Zucchini Hummus, Egg-less 'Egg' Spread, Mock 'Chicken' Salad, Tuna Salad, and Mock Salmon Pate. I've even made a Mock 'Liver' type spread (although I prefer to call it 'Nuts for Mushroom Pate'. It just sounds so much more... well, shall we say 'appetizing'?)

Nuts for Mushroom Pate
Inspired by Richard Salome's Vegetarian Chopped Liver Pate

1/2 cup soaked pumpkin seeds
1/2 cup soaked almonds
1/4 cup soaked walnuts
1/8 cup brown sesame seeds
1/8 cup soaked sunflower seeds
1 or 2 garlic cloves
1/2 cup mushrooms
1/2 tsp paprika
1/2 tsp powdered kelp
big handful of fresh parsley
1/4 tsp sage
2 tbs lemon juice
1/2 tbs oil
Braggs or salt, to taste
a little water

Blend nuts and seeds in processor until smooth.

Add remaining ingredients and blend until smooth, adding water until desired consistency is reached.


Of course, there are also excellent raw versions of all-time favorite condiments. Here are a few of them:

Avocado Mayo
Posted in RawGuru's most recent newsletter

2 ripe avocados
1.5 tbs. lemon juice
2 pinches Celtic Sea Salt
½ cup soaked raw cashews
1 tbs. parsley
1 tbs. avocado oil
¾ cup water

Blend until smooth.


'Mustard'
Posted by Doe on Raw Food Talk

1 cup brown soaked mustard seeds
¾ cup lemon juice
½ tsp salt

Blend until smooth.


'Aioli Sauce'
Posted by Doe on Raw Food Talk

1/2 avocado
3 tbsp olive oil
1/4 cup lemon juice
1 tbsp apple cider vinegar
1 tbsp raw honey or maple syrup
1 tbsp nama shoyu
1 tbsp prepared mustard (optional)
1 clove garlic
1/4 C chopped parsley
2 tbsp chopped basil
Fresh water as needed
Pinch sea salt or to taste

In a blender, blend avocado, olive oil, lemon juice, apple cider vinegar, honey or maple syrup, nama shoyu, mustard (if desired), garlic, parsley, and basil until smooth. Add fresh water a few drops at a time to blend to desired consistency. Season with sea salt. Sauce should be thick and smooth.

For more yummy raw condiment ideas, you may want to visit this thread.


Just Make A (Sand)Wish
Some of our favorite sandwiches include nut cheese, avocado, tomato, marinated mushrooms and lettuce on almond bread (shown on left) and BLT on onion bread. Yep, there's even a raw approximation of bacon made with eggplant (although, eggplant bacon doesn't really taste like the 'real' thing - which is totally fine by me!) The recipe is a classic on Raw Food Talk.

Eggplant as a bacon
Recipe by Top Raw Men, posted
by Sweet lips

1 large eggplant, thinly sliced lengthwise
3/4 c. oil (I only used 1/4 cup oil)
1 tsp. cayenne
2 Tbl. honey
4 Tbl. Ume Plum Vinegar (ACV works good too)

Marinate for 2 hours. Place on teflex sheets and dehydrate for 9 hours. Turn bacon over and dehydrate another 9 hours. (Didn't take me that long though.)


But wait, since pictures are worth a thousand words, how about I let Raw Food Talk's many talented raw chefs give you some more great sandwich combos?

Beckla's romaine and tomato using calzone crust for bread:


Eilene's Mediterranean Almond Bread with Eggless-Egg Salad, Avocado, Romaine and Tomato:


JennaBoBenna's Onion bread sandwich with creamy cashew cheese, tomatoes, zukes, romaine and orange bell peppers:


Petals' Meatloaf Sandwich made with Rawlife's meatloaf, Rawkinloc's garlic bread, Alissa's spinach dip, some onions, tomatoes, and lettuce:


Crisyn's Open Faced Sandwich - Mediterranean Almond Bread, topped with Eggless Egg Salad, baby greens, tomato and some perfectly ripe avocado:


Ertarox's Deli Sandwich: Avocado Spread, Zesty Herb Cheeze, tomatoes, cucumbers, sprouts, and a thick layer of marinated portabella mushrooms on rye bread (made with Alissa's rye bagels recipe):


And last but not least, RawVeganMom's BLT on chewy onion bread with sunflower mayo:

Mmmmmmmmm... Making me fall in love with raw sammies all over again!

Raw Wrhapsodies
Wraps are the healthy, 'hip' version of sandwiches; perfect for those times when you feel like something a little lighter. We used to make wraps out of Ezekiel sprouted tortillas, but these sort of fell by the wayside too, as we embraced a fully raw diet.

Last summer, my good friend and raw chef, Chantale Roy, was selling wonderful, tasty veggie wraps at the farmer's market. So light, pliable and uniquely different from anything we'd ever tried before! Armed with the list of basic ingredients, I tried to recreate them at home, but let's just say that the results weren't too conclusive (and I'm being generous! LOL) In any case, they looked more like crackers (and crumbly ones at that!) rather than soft wraps. Disappointed, I gave up on my wild wrap experiments, hoping I'd eventually come across a similar recipe.

When I recently stumbled upon Cherie Soria's veggie wraps (thanks to s.alubrio.us' del.icio.us raw recipes bookmarks), I instantly knew I had finally hit the jackpot!

You'll find 3 of Cherie's recipes for soft tortillas/wraps on this site. If you look closely, you'll notice that they all follow a basic formula of 10 to 12 cups of veggies, avocado, seasonings, and psyllium husk powder (to help the ingredients bind). Once you get a feel for it, you can easily adapt the wraps to suit whatever you have handy. A great way to use up those veggies that are wrinkling away in your fridge too!

Here is my tweaked up version of Cherie's Salsa Wraps:

PepperAma Wraps
(This one is for you, Ama, pepper-lover that you are!)

5 cups seeded and chopped red and yellow bell peppers
3 cups chopped zucchini
1 cup tomato, seeds removed
1 cup sundried tomato, soaked and drained
1 tablespoon leek (although green or red onion would work too)
2 teaspoons onion powder
1 to 2 cloves garlic, crushed
½ teaspoon sea salt
1 avocado, peeled, seeded, and mashed
3 tablespoons psyllium powder
¼ cup chopped cilantro, packed (optional)

1. In a high-powered blender, purée the bell peppers, zucchini, tomatoes, and leek or onion until smooth. Add the onion powder, garlic, and salt, and purée again. While blender is still turning, add the avocado, and then the psyllium powder, and blend well for a few seconds.

2. If desired, pulse in the cilantro until it is broken into pieces. Do not fully process; the cilantro should be in small pieces.

3. Using 1/2 cup of the mixture for each wrap, use a flat rubber spatula to quickly form four flat disks on a dehydrator tray lined with a nonstick sheet. Each disk should be about 7 inches in diameter, and they should not quite touch each other. Spread the wraps into round disks quickly, or the mixture will thicken and become difficult to spread.

4. Dehydrate at 105 degrees for about 4 hours, or until you can easily remove them from the nonstick sheets.

5. Turn the wraps over onto mesh dehydrator screens. Place an additional mesh screen on top of each tray of wraps. This makes them flatter and easier to store. Continue dehydrating another 3 to 4 hours, until dry but still flexible.

6. Store in an airtight container in the refrigerator for up to two weeks, or in the freezer for up to two months.

As you can see, I also experimented with making some square wraps. It does save a little work, although you do get the hang of making the circles after a while. Just spread the batter (maybe a little over 2 cups) on an entire teflex sheet and then score it into 4. Alternatively, you could probably cut the wraps after they're dehydrated, with scissors or pizza cutters.

Here they are on the way to the D...


More Rawesome Fillings
For some reason, it just feels like you can be a lot more creative with wraps than sandwiches. Perhaps because you get to fit that much more filling into them (which has always been my favorite part anyway! LOL)

Actually, the veggie wrappers are so deliciously flavorful themselves that you'll find you don't need much more to make a tasty meal.

Here are some yummy fillings we've tried so far:

  • Rich Cheddar Sauce, marinated zucchini and Portobello mushrooms, alfalfa sprouts, red and yellow peppers and black olives.
  • Creamy Spinach Spread, mung bean sprouts, alfalfa sprouts, red and yellow peppers.
Creamy Spinach Spread
This is actually a very simple recipe. I got the idea one day when I had left over 'cream cheese'.

Cream Cheese
1 ½ cups raw cashews, soaked for at least 1 hour
½ cup pure water
1 tsp salt (or to taste)
1 Tbsp Lemon juice

3 cups of spinach (we like it with lots of spinach but you could use less if you want)
minced garlic, to taste
Tamari or salt, to taste
your favorite fresh or dried herbs (optional)

Prepare the cream cheese (or use some you have already made).

Pulse chop the spinach in your food processor until finely minced. (You don't want a green mush though!)

Gently fold the spinach, garlic and seasonings into the cream cheese.

That's it!


Another scrumptious and quickly whipped-up filling is avocado mashed up with a little pesto of your choice, tomato, lettuce and sprouts. Simple but so tasty!

My friend Chantale makes delightful, exotic wraps. Here are a few of her awesome filling ideas:
  • California: pecan paté, veggies, mango, avocado, clover sprouts
  • Tuscane's sun: Brazil and cashew nut 'cheese', sun-dried olives and tomatoes, marinated onions, peppers, clover sprouts
  • Pizza: Pine nut ricotta 'cheese', basil pesto, veggies, clover sprouts

These wraps make such a wonderful, light alternative to nut or seed-based breads and crackers. They also make ideal traveling food. (In fact, the wrap recipes were posted on a site about raw foods to bring when going hiking.)

There you have it! Countless, delicious possibilities to play with! I can just tell that we'll pretty much live on sammies and wraps this summer, when the heat (can hardly wait!!!) will naturally move us away from the heavier, more complex meals. Plus, I doubt that I'll feel like uncooking up a storm and cranking up the D too often while the sun is shining outside... unless, of course, we relocate The Sunny Raw Kitchen on our deck! (Is there such a thing as raw BBQ's? LOL)

Sunny Raw Tips
Make sure to assemble your wraps a little ahead of time before serving. This will allow the fillings to soften the veggie wrappers. They'll just melt in your mouth! Mmmmmmmm

For an even easier and lighter alternative, simply wrap your favorite fillings in lettuce, chard, collard or cabbage leaves. Oh, and I almost forgot nori sheets!

*~*~*~*
Photo Credits
Almond Bread Sandwich by Fairygirl
Onion Bread (adapted from Rawvolution's recipe) Sharon in Colorado
Alissa's Rye Bagels by Veganforlife
Onion Bread Sandwich by SeaGrass7
Eggplant Bacon by Veganforlife


Sunday, March 11, 2007

New Kitchen Gadgets

You may have noticed a few recent changes around the Sunny Kitchen lately; all aimed at helping you find your way more easily around this site.

Recipe Index Revisited
In addition to the newly added Recipe Index being organized alphabetically, by categories as well as by blog posts, you can now see at a glance whether recipes are 'dehydrator-free' or 'dehydrator-friendly'.

Googling the Kitchen
Can't remember which post talked about dehydrating temperatures? Wondering whether I've already discussed feeding raw foods to our animal friends? Or perhaps you have a bunch of ripe tomatoes sitting on your counter and would like to see if there's any interesting recipe ideas floating around this blog. You can now do a search of the SRK's archives through a Google Search Engine. Simply type in what you're looking for and hit the button!

Playing Tags
What's with the list of Technorati tags appended at the end of each post? In case you aren't already familiar with Technorati tagging, here's how it works. A Technorati tag is a "keyword or category used to describe the subject matter or topic of a blog post." Say you were interested in the category "raw recipes." By clicking on that particular tag, not only will you be given a list of all the relevant posts on The Sunny Raw Kitchen labeled "raw recipes", but you can see all the blogs registered with Technorati having posts discussing "raw recipes" as well. Technorati is what's known as a "blogosphere search engine," giving you an inside glimpse into the ever-growing 'blogworld'. Man, you just gotta love technology (when it's working! LOL)

To learn more about Technorati tags, you can visit this blog.

Cheesecake Home Delivery
One more thing before I go off on today's uncooking spree. Speaking of technological glitches, for some mysterious reason, Feedblitz (the service that I use for notifying subscribers of new posts on The Sunny Raw Kitchen), was experiencing some trouble last night. As a result, those who have subscribed to this blog did not receive an email informing them of yesterday's post on Raw Cheesecakes. All you have to do is keep scrolling down to submerge yourself into "Healthy Decadence" or access the post from the archives in the sidebar. (And don't you worry, I kept you a nice, big piece...)

Oh, and while on the topic of Feedblitz subscriptions, a few of my readers have mentioned to me how they have signed up, yet haven't been receiving any email notifications. As I was saying, it's good to keep in mind that computers aren't infallible. Also remember that the Feedblitz registration is a two-step process. Once you have filled in your email address in the appropriate box, keep a close eye on your inbox. You should receive an email (usually within minutes) asking you to confirm your subscription. If you don't, you might want to check your SPAM folder, in case it was sent there. I know it's a bit of a drag, but the idea is to avoid other people signing you up for blogs you're not interested in (or worse, never even heard of!) If you are still experiencing difficulty, it might be a good idea to just try signing up again.

Have a good one everyone!

Saturday, March 10, 2007

Healthy Decadence

...or How to 'Have Your Cheesecake and Eat it Too'!

In case you thought that the Raw Food Diet is about sacrifice and austere deprivation, I have some great news for you: it is anything but! You can make all sorts of incredibly tasty raw gourmet dishes, but desserts are 'creating in the raw' in its most stunning and delectable form. (If you still have your doubts, just take a peek at my post about Fairygirl here. That should take care of it!) What's more, raw desserts have all the scrumptious looks and palatable taste of the most exquisite cooked desserts... minus the undesirable side effects. Guilt-free decadence? Mmmmmmmm... Now you're talking!

Even Better Than The 'Real' Thing
I must have had SAD cheesecake only twice in my entire life. (I'm not kidding!) All that sugar and cheese... No thanks! What can I say? I was never a big fan of desserts. (I mean, prior to getting into Raw... lol) Therefore, I was initially a little suspicious of raw cheesecake. I kept procrastinating and procrastinating until I could no longer ignore all the hoots and raves about it.

Imagine my surprise (and delight!) when I discovered that while raw cheesecake is sweet, creamy and rich, the resemblance with its infamous twin stops here. It is a perfect example of how the 'living' version of a recipe can surpass the SAD one in every way. As Cherie Soria, founder of Living Light Culinary Arts Institute, would say: "If you can make a raw vegan cheesecake better than regular cheesecake, why would you eat regular cheesecake?"

Cheesecake Making Demystified
In spite of what it may look like, making cheesecake is really not that difficult. There are many different variations, but if you look closely, they are all very similar. Come on! Let me walk you through the process of making my Tropical Cheesecake. You'll see what I mean...

First, we'll start with the crust. Most crusts are basically a combination of nuts and dried fruits, such as raisins or dates. My personal favorite uses pecans and dates, oh and that's a smidge of cinnamon and a pinch of salt you can see in there too:


Process until crumbly but not too much, as you don't want it to turn into a paste.


Then press the crust mixture into the bottom of a spring form pan. If you don't have one, no problemo! You can use a margarine tub or cake pan lined with saran wrap.


A'right, now we'll set the crust aside for a moment and get to work on the filling. Again, if you look at several cheesecake recipes, you'll notice how the filling ingredients are basically the same. One slight variation that you may encounter is in regards to coconut oil. Coconut oil stays firm at room temperature, therefore helping the cheesecake hold its shape once out of the fridge. You may also notice recipes calling for cacao butter. Besides lending its chocolate flavor, cacao butter also acts as a firming agent.

Here are the ingredients that we used for this particular recipe: soaked cashews, agave syrup, lemon juice, vanilla and water. We actually forgot to put coconut oil in and, as a result, the finished cheesecake turned out a little on the soft side.


Pour filling over the crust mixture and put in the freezer for a few hours to set.


Once the cheesecake has firmed up, you can take it out and gently transfer it onto a serving plate. Leave in the fridge to thaw.

Now, this is the point where you can let it rip and go whichever way you want: fruit or berry sauce, chocolate layer or whatever topping you fancy. This cheesecake was 'meant to be' Fairygirl's Chocolate Cream Stack but evolved into something quite different altogether. (Yet another example of how recipes sometimes have a mind of their own!)

We put slices of kiwi on top of the filling. Then we covered these with a Coconut Whipped Cream:


And the final touch: pieces of pineapple...


Tada! Tropical Cheesecake!


We served the cheesecake drizzled with a strawberry and agave sauce and dried coconut flakes:


Tropical Cheesecake

Crust:

2 cup of pecans, soaked and dried (or dehydrated)
12 soft dates
a dash of salt

Process the ingredients in a food processor until they are crumbly and will hold together. Press the crust mixture into the bottom of a spring form pan* and set aside.

* If you don't have a spring form pan, you can use one of those margarine tubs and line it with saran wrap.

Filling:
3 cups cashewssoaked for a few hours
1/2 - 3/4 cup honey or agave
1/2 cup lemon juice
2/3 cup coconut oil (warmed up in dehydrator or in bowl of warm water)
2 " piece of vanilla bean (or 1 tsp pure vanilla)
1/4 cup of water (or maybe a little more)

Blend everything in a high power blender or food processor until smooth. If using a FP, stop to let it rest a few minutes so as not to stress the motor.

Whipped Cream
From a Strawberry Cheesecake recipe that RawGuru posted on the Sunfood Nutrition Raw Food Lifestyle Forum

1 cup young coconut meat (chopped up)
3 tbs. raw cashews or mac nuts (soaked for 8-10 hrs)
5 dates or 1 tbs. honey (or more if you like it sweeter)
3 tbs. coconut water or almond milk
1/2 tsp. lemon zest
drop of vanilla extract

Blend until smooth.

Strawberry Sauce
1 bag of strawberries
1/4 cup of agave or honey

Blend until smooth.

To assemble:
Pour filling into the crust and let set in the freezer.

Once the cheesecake has firmed up, take out and gently transfer it onto a serving plate. Leave in the fridge to thaw.

Cover with slices of kiwi and a nice thick layer of Coconut Whipped Cream.

Decorate with pieces of fresh pineapple.

Served the cheesecake drizzled with Strawberry Sauce.

Close your eyes and enjoy!


Berry Cheesy Cake
There's a bunch of mouth-watering cheesecake recipes on the Raw Food Talk Forum, but a modified version of Emily Lee Angell's 'Just Like Cheesecake' is probably one of the most 'famous'.

The following is the original recipe and was recently posted by razzleberry under the thread 'Thank God 4 Raw Cheesecake' which says it all...

Just Like Cheesecake
By Emily Lee Angell ("The Complete Book of Raw Food")

Makes: 24 slivers

For the Crust:
2 cups raw mac nuts
1/2 cup dates, pitted (medjools)
1/4 cup dried coconut

For the Cheese:
3 cups chopped cashews, soaked for at least 1 hour
3/4 cup lemon juice
3/4 cup honey
3/4 cup coconut oil
1 teaspoon vanilla
1/2 teaspoon celtic sea salt (optional)

For the Raspberry Sauce:
1 bag frozen raspberries (or use whatever berries you prefer)
1/2 cup dates

To make the crust, process the macadamia nuts and dates in the food processor. Sprinkle dried coconut onto the bottom of an 8 or 9 inch spring form pan. Press crust onto the coconut. This will prevent it from sticking.

To make the cheese, blend the cashews, lemon, honey, gently warmed coconut oil (do not use microwave), vanilla, sea salt (if using), and 1/2 cup water. Blend until smooth and adjust to taste.

Pour the mixture onto the crust. Remove air bubbles by tapping the pan on a table.

Place in the freezer until firm. Remove the whole cake from the pan while frozen and place on a serving platter. Defrost in the refrigerator.

Serve with Raspberry Sauce.

Razzleberry's Notes:
I forgot to add the vanilla, but mine still tastes amazing! And instead of honey, I used agave and dates. Oh, and another tip. BLEND, BLEND, BLEND all the cheese mixture so it is very creamy and there aren't big chunks of cashews left. Probably an obvious thing to say, but hey!


Cheesecakes for Chocolate Lovers
While working on this post, I made Sheryl Duruz's Chocolate Caramel Divine Cheesecake from the gorgeous Raw Food Holiday Celebration Guide. (Well, ya know, I had to know what I was talking about!) Sheryl also posted the recipe on Raw Food Talk. You can find it here.

As you'll see, her cheesecake filling is essentially identical to the one above, except that she calls for a little cacao butter and some agave instead of honey. As I didn't have cacao butter, I simply replaced it with coconut oil. I also used less agave, perhaps only 1/2 cup.

Although it was quite good, if I was to make it again, I'd put a little less coconut oil and lemon juice, and reduce the salt to a pinch. But hey, everyone's taste buds are different. To demonstrate this point, my neighbor (to whom I had sent a couple of pieces), walked in my kitchen this afternoon, praising how "excellent" and "unreal" the cheesecake was! She still can't get over the fact that it was all raw!

Staying with the chocolate theme, raw chef Vanessa Sherwood, featured on GreenChefs, posted the recipe to her decadent Blackforest Chocolate Cheesecake on Raw Food Talk. (The place is a real treasure chest, I tell ya!) Man, if that doesn't look like raw dessert at its best, I don't know what does! (It's on top of my 'to-make' list!) On GreenChefs, it is described as "bursting with sweet cherries layered between a chocolate crust and a creamy chocolate cheesecake filling."

Blackforest Chocolate Cheesecake
By Vanessa Sherwood

Filling:
2 cups cashews, soaked 1 hour or more
1/4 cup agave nectar
1/4 cup maple syrup
1/2 cup water
1/4 cup cacao butter, melted
1/4 cup coconut oil, melted
1-2 teaspoons coffee extract (optional)
1 teaspoon vanilla extract
Seeds from 1/2 vanilla bean
1/4 teaspoon salt
1 cup cocao powder
1 10oz package frozen cherries, thawed

Blend everything together except for the cocoa powder and cherries until completely smooth. At this point, if your blender can take it, blend in the cocoa powder. Otherwise scrape the mixture into a mixing bowl and whisk the cocoa powder in by hand. Hand mix in the thawed cherries. If you want to make a sauce out of the cherries, either set some aside or use an additional package.

*About the coffee extract. Coffee enhances the flavor of chocolate. I use Java Juice- Pure Organic Coffee Extract. The website is www.javajuiceextract.com. If you don’t want to use it, substitute more vanilla extract or just leave it out.

Crust:
1/2 cup brazil nuts
1/2 cup shredded coconut
Pinch of salt
1 heaping tablespoon cocao powder
1-2 tablespoons agave
1-2 tablespoons cacao nibs
Seeds from 1/4 vanilla bean

Process the brazil nuts, shredded coconut, salt, cocoa powder and vanilla bean seeds in a food processor until fine crumbs. Add the agave and cacao nibs until the mixture just starts to stick together. Press into the bottom of a springform pan. If you are making a large cheesecake, feel free to double or even triple the recipe (crust and filling).

Pour the filling over the crust and chill or freeze until ready to serve.


Vanessa also posted a White Chocolate-Strawberry Cheesecake that's looks just fabulous. You can find the recipe here.

Have I got you drooling all over your keyboards yet? Well I AM so I better stop! lol

Now if I've piqued your curiosity, tickled your bellies and left you wanting for more, remember that there's lots of raw cheesecake recipes floating around the web. All you have to do is get digging...

It's your turn to see for yourselves what the fuss is all about. So which recipe is gonna be first?

*~*~*~*
Photo credits:
Raspberry cheesecake from Living Light Culinary School by AmaFlynn
Caramel Divine Cheesecake from Raw Food Holiday Celebration Guide
Cheesecake with Blueberry Sauce by lunalin
Raspberry cheesecake by RawFoodieMom
Blackforest Chocolate Cheesecake by Vanessa Sherwood
White Chocolate-Strawberry Cheesecake by Vanessa Sherwood